Installing a high availability web server cluster on Ubuntu 12.10 using HAProxy, HeartBeat and Lampp

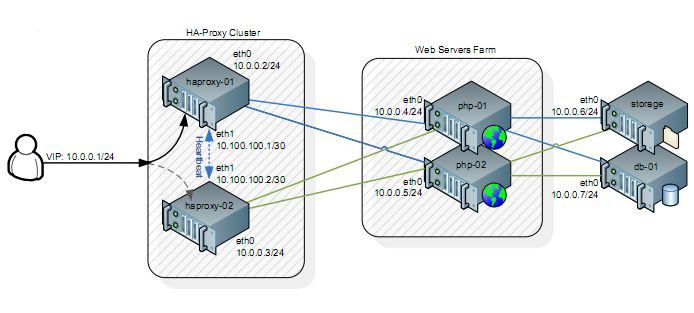
What is the main objective of this entire topology?

Redundancy and Load Sharing! Imagine a scenario where your single web server is receiving millions and millions of HTTP requests per second, the CPU load is going insane, as well as the memory usage, when suddenly “crash!”, the server dies without saying good-bye (probably because of some weird hardware out-stage that you certainly won’t have time to debug). Well, this simple scheme might lead you into a brand new world of possibilities.

What is this going to solve?

Hardware Failures! We are going to have redundant hardware all over the place, if one goes down, another one will be immediately ready for taking its place. Also, by using load sharing schemes, this is going to solve our High Usage! issue. Balancing the load among every server on our “farm” will reduce the amount of HTTP request per server (but you already figured that out, right?).

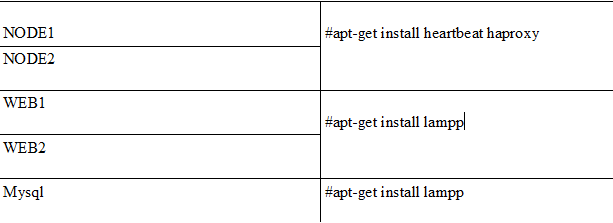
Let’s set it up! Firstly, we’re not going to use a domain scheme (let’s keep it simple), make sure your /etc/hosts file looks exactly like the picture below on every machine:

#vi /etc/hosts
192.168.0.241   haproxy
192.168.0.39    Node1
192.168.0.30    Node2
192.168.223.147 Node1
192.168.223.148 Node2
192.168.0.58    Web1
192.168.0.139   Web2
192.168.0.132   Mysql
Secondly, here is what you’re going to install (on a per-server basis):

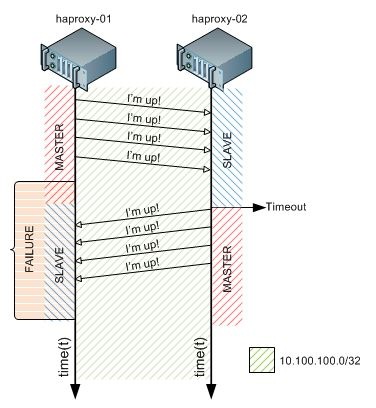
That’s right. We are going to use a very handsome application named “heartbeat” as our first level redundancy, it will be responsible for keeping our HAProxy (our “Reliable, High Performance TCP/HTTP Load Balancer”) redundant. Don’t you agree that having only ONE load balancer means there’s a single point of failure? Well, redundancy is all about overthrowing this statement, we shall never have a single point of failure, and that’s why we are not deploying a single HAProxy.

So… how does this “heartbeat” work? It is very simple, indeed. Look at our topology (first picture). We’re setting up heartbeat to monitor two servers, one of them is called “master” and the other one “slave”, and they are constantly exchanging their status information through eth1 (10.100.100.0/32), a dedicated point-to-point network. Basically, they tell each other: “I’m up! I’m up! I’m up!…” and whenever a node stop listening this, it will act as the new master by adopting what we call the “virtual IP address” (or VIP). By the way, the VIP is the address that your user is going to use whenever he wants to reach the web server. Check out the illustration on the right.

Setting up the heartbeat is easy, after the installation you will need to create those files on both servers (Node1 and Node2):

Node1 :
# vi /etc/ha.d/ha.cf
debugfile /var/log/ha-debug
logfile /var/log/ha-log
logfacility     local0
keepalive 1
deadtime 5
warntime 10
initdead 15
udpport 694
bcast   eth1
auto_failback on
node    Node1
node    Node2
# vi /etc/ha.d/haresources
Node1
       IPaddr::192.168.0.241/24/eth0 lampp
# vi /etc/ha.d/authkeys
auth 3
3 md5 polaris
Now, change the file permissions to 600 like so :
#chmod 600 /etc/ha.d/authkeys
HAPROXY Setup :
 
#vi /etc/haproxy/haproxy.cfg
End of the line add
listen     web-cluster         192.168.0.241:80
                 mode http
                 stats enable
                 stats auth admin:polaris # Change this to your own username and password!
                 balance roundrobin
                 option httpclose
                 option forwardfor
                 cookie JSESSIONID prefix
                 server web1 192.168.0.58:80 cookie A check
                 server web2 192.168.0.139:80 cookie B check
The very last step, before starting the HAProxy daemon is to enable the daemon, again, this step needs to be carried out on both servers!
#vi /etc/default/haproxy
and change :
ENABLED=0
to
ENABLED=1
Node2 :
# vi /etc/ha.d/ha.cf
debugfile /var/log/ha-debug
logfile /var/log/ha-log
logfacility     local0
keepalive 1
deadtime 5
warntime 10
initdead 15
udpport 694
bcast   eth1
auto_failback on
node    Node1
node    Node2
# vi /etc/ha.d/haresources
Node1
       IPaddr::192.168.0.241/24/eth0 lampp
# vi /etc/ha.d/authkeys
auth 3
3 md5 polaris
Now, change the file permissions to 600 like so :
#chmod 600 /etc/ha.d/authkeys
HAPROXY Setup :
 
#vi /etc/haproxy/haproxy.cfg
End of the line add
listen     web-cluster         192.168.0.241:80
                 mode http
                 stats enable
                 stats auth admin:polaris # Change this to your own username and password!
                 balance roundrobin
                 option httpclose
                 option forwardfor
                 cookie JSESSIONID prefix
                 server web1 192.168.0.58:80 cookie A check
                 server web2 192.168.0.139:80 cookie B check
The very last step, before starting the HAProxy daemon is to enable the daemon, again, this step needs to be carried out on both servers!
#vi /etc/default/haproxy
and change :
ENABLED=0
to
ENABLED=1
Now start haproxy and heartbeat to Node1 and Node2 as :
#/etc/init.d/heartbeat start
#/etc/init.d/haproxy start
Hmm… you might find an error message (cannot bind socket) on haproxy-02, this happened because the kernel is not ready (by default) to bind this kind of socket to a remote machine. By this moment, the virtual IP address belongs to the master node (haproxy-01), this why haproxy-01 started the haproxy without any problems. The solution lies here:
#echo “net.ipv4.ip_nonlocal_bind=1”  >> /etc/sysctl.conf
#sysctl -p

This artical is contributed by . If you also want to contribute, click here.

Leave a Reply

Your email address will not be published. Required fields are marked *

0
0
0
0
0
0